Sizing Through the AI Assistant
The assistant can drive the solver directly, which makes it the fastest way to sweep a parameter across several values. This tutorial runs the same screen as Spring Valve From the Database, but entirely through conversation, and finishes by pulling the chosen result back into the workspace.
It takes about ten minutes and costs three solver runs plus AI tokens. The assistant is available on plans that include AI usage.
The assistant is a language model. Its wording will differ from the transcript below every time, and it can be wrong. What is fixed is the shape of the exchange: it gathers parameters, lays them out for you to approve, solves once you press the button, and hands back a result card. Read the numbers on the card, not the prose around them.
Step 1: Open the Assistant
Click Ask AI in the toolbar. A panel opens with a disclosure notice, three suggested topics, and a message box. You can drag it, resize it, and minimise it while you work.
Step 2: State the Whole Case in One Message
The assistant cannot see your parameter panel, so give it the case rather than pointing at the screen. A good first message names the pack, the scenario, the conditions, the limit, and the valve.
30 litre pack, five Demo-NCM-40Ah cells venting, gas at 25 C,
enclosure limit 20 kPa above ambient. Using the S001 valve,
how many valves do I need to stay under the limit?
Everything the solver needs is in that sentence. Compare it with “is my valve big enough”, which cannot be answered at all.
Step 3: Check the Parameter Table Before Confirming
The assistant does not solve immediately. It looks up the built-in database first, then puts a parameter table on screen with a Confirm & Run button under it. Nothing is calculated until you press it.
This step exists because a confident answer computed from the wrong pressure limit is worse than no answer. Read the table. Every row carries a Source telling you where that value came from:
| Source | Where the value came from |
|---|---|
user | You said it in this conversation |
confirmed earlier | Carried from the set you last confirmed |
workspace panel | Read off your parameter panel, because nobody mentioned it |
default | The schema default, because there was nothing else |
from valve | A property of the valve, not an input |
The two rows worth the most attention are the ones marked workspace panel,
which came off your screen rather than out of your message, and the maximum
pressure limit, which the assistant must never assume on its own.
To change a value, say so in the chat. A new table appears, and the old one is marked superseded. Press Confirm & Run on the one you want.
Step 4: Read the Result Card
The card is compact and carries everything that matters:
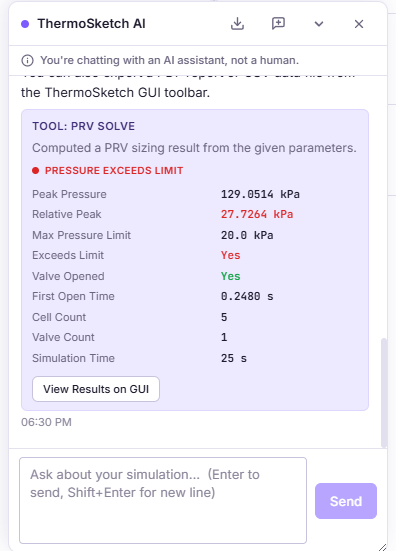
| Field | Meaning |
|---|---|
| Peak P | Absolute peak pressure |
| Rel. P | Peak relative to ambient, the figure your limit applies to |
| Valve | Whether it opened |
| Opens at | First open time |
| Limit | The limit this card was judged against |
For our one valve case the card reports a peak of 129.1 kPa, 27.7 kPa
relative, opening at 0.248 s, and a red PRESSURE EXCEEDS LIMIT against the
20 kPa limit. That matches the workspace result exactly, because it is the
same solver.
Always read the Limit line on the card. It is the threshold the verdict colour was judged against, and it is the one figure that changes a pass into a fail without changing a single pressure. The parameter table shows you where it came from before you confirm; the card shows you what was used after.
Step 5: Sweep
This is where the conversation earns its place. Rather than editing a field and pressing Run three times, ask for the sweep:
Now try two valves and then three valves, same case.A sweep gets one parameter table like any other, with the swept row showing every value it will try and the button reading Confirm & Run (2 solves). The run count is on the button because each value is a real solver run against your allowance, exactly as pressing Run would be. One press covers the whole sweep. Six values is the ceiling.
The results come back as one comparison table, a row per value, each with its own View button:
| Valves | Rel. P | Verdict | Opens at |
|---|---|---|---|
| 1 | 27.73 kPa | Over limit | 0.248 s |
| 2 | 12.05 kPa | Within limit | 0.251 s |
| 3 | 9.50 kPa | Within limit | 0.254 s |
The assistant will tell you which values cleared the limit you set, and what the gap between neighbouring rows is, because both come straight out of the solver. It will not tell you which count to fit. That is the same judgement call the manual tutorial makes for itself: the second valve is worth 15.7 kPa and the third only 2.5 kPa, so two is the sensible choice here. Whether that margin is enough for your enclosure is yours to decide, not the tool’s.
Step 6: Bring the Result Into the Workspace
The chat card is a summary. It deliberately does not contain the time series, and the assistant cannot plot the pressure curve, because it never receives one.
To get the full result, press View Results on GUI on the card you want.
Three things happen at once:
- the parameter panel is backfilled with the values that produced that result, so Number of Valves changes to match the card
- the charts are drawn and the Key Results column fills in
- the Messages console logs
Chat result applied to the workspace.
The button then reads Results Shown on GUI, so you can tell at a glance which card you are looking at.
From here the result behaves like any other. Export the CSV, download the PDF, or save the configuration. Exports always come from the toolbar, never from the conversation.
Step 7: Finish in the Workspace
Two habits worth keeping.
Verify before you export. Apply the card, then look at the parameter panel and confirm it says what you expect. This takes five seconds and catches the case where the assistant used a value you did not intend.
Do the sensitivity checks yourself. The temperature check from Spring Valve From the Database is the one that decided that case, and it is worth running deliberately rather than asking for it in passing.
When to Use the Conversation, and When Not To
Good uses. Sweeping a parameter across several values. Checking valid ranges and units without leaving the tool. Listing what is in the database. Running a variation without disturbing a case you have carefully set up in the panel.
Poor uses. Anything where you want a chart, a file, or a link. Anything resting on a value you have not stated explicitly. And any final safety judgement, which needs the same scrutiny you would give your own calculation. See AI Assistant and Assumptions and Limits.